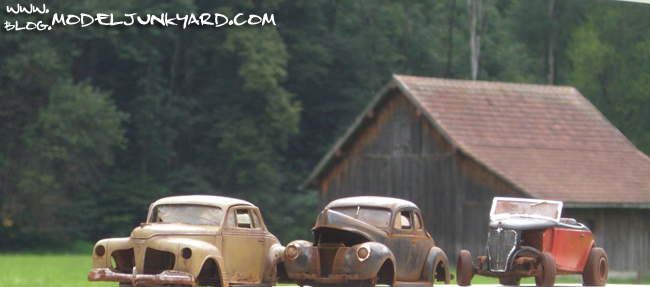
I’ve built this model right after the 40 Ford and the 57 Ford junker plus sofa. So this was my third junk scale model. The idea was to make a simple build. So I didn’t put much extra effort on scratch building parts or anything else. Still, I did take the time to cut the doors and the trunk open.

If you are building this kit, you should pay special attention to the front. The area around the grille is a sperate part and it fits horribly out of the box. I takes only a little time and a little putty to make it look better. The front lights and the grille weren’t really good parts, so I decided to leave them out altogether. The bumpers were pretty cool, right out of the box – just needed to apply some rust on them.

As I wrote above, I also made the trunk lid open. Now if you pay attention, you will notice how the trunk lid looks too thick. This was one of my first builds – back then, I didn’t sand the borders. All you need to do here, is just to sharpen that border with a file tool and that’s it – it was two minutes and looks much better than that.
I also made a hole where the gas cap should be. And rust holes everywhere! The rear fender on the driver’s side has a small bump too.

A trick I loved back then was to glue some paper tissue on the roof (inside the car) and pull it appart. Gives the hole thing a little touch.
As you can see, this junker isn’t fill with tons of work hours and scratch built parts. Maybe a few more details here and there would have been great, but it is still a cool build. My point here is, that you can also make great models in a weekend, or even a day. It is sometimes a cool thing to have small projects. Plus these kind of junkers can also be very well used as background cars in a diorama or so.


Hey Iggy, that’s a very cool model! Thanks for posting! It’s very inspirational for the model I’m working on now. I’ll send you a few pics when I’m done.
http://www.facebook.com/media/set/?set=a.3128059850000.2159463.1519802857&type=3
My last build up. Decided on just keeping it simple. I have a few diorama pieces I recently finished included with the car. The background is a MRC Texaco kit I have extended to two bays. The base is unknown – can’t remember who manufactured it but I liked it because it has the two floods and a lighted gas pump. Somehow, everything together looked kind of good. Thought I’d share a simple project with you.
The rat rod is the recent Round 2 25 model T two models in one kit. I couldn’t resist a rat rod. Wheels, aircleaner and tailights are from a 1979 release of a AMT / MAtchbox 49 Ford kit. Steering wheel is fropm the recent 60 Ford Starliner kit (AMT Round 2). My texaco is a MRC kit that I have added a second bay to. This is just the front wall as a backdrop. I can’t recall who makes the base I placed the kit on but I was impressed that they included a lighted flood light and gas pump to the enclosure. Anyway, just keeping it stupid and simple – I hope you like my lil rat rod project. 2 weeks to completion. Not perfect but I like it.
Wonderfull work ,
I like very much .
Thanks Claudio! actually my brother made it but he is traveling now, so I’m answering all messages this days.