Shoot! That painjob turned out a real mess! What to do now? Throw the model away, put it on ebay for a buck, finish it as-is and live with it? No way! Life is all about second chances! And so it is with model cars.
The trick is called “caustic soda” also known as lye or Sodium hydroxide (NaOH). You can get it on a local hardware store or paint store as flakes or granules. It is highly acid and you should be very careful with it. It works pretty well for plastic model cars painted with enamel paint.
You will need:
- protection goggles
- rubber globes
- tooth brush – you will never use it again for your teeth after this
- a plastic container, such as a tupper ware, big enough to fit a model car in it – you will never use this either for food or such.
- caustic soda – always keep away from children!
- some water
- a ventilated working environment
- a model car looking for a second life after a bad paint job
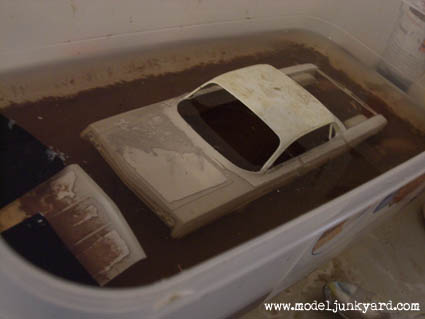
With goggles and globes on, put some caustic soda into the plastic container. A full soup spoon will do. Put some water first to dissolve the caustic soda and stir until you don’t see the solid material. Note that the caustic soda heats up while being mixed with water. You may place your model car now and put some more water until the level covers the hood. Put the plastic container somewhere where kids cannot reach it. After half a day, try to brush down the paint – always wear your protection gear!. Depending on the paint job it may take more or less time and effort. After you finish the sides, hood and rear you may put the model car upside down to do the same process for the roof. You may also completely cover the car with water to save this second step – but you will need more caustic soda and more water.
You can use the liquid several times. I recommend that you do not keep it around for a long time, though. Once you are done, dispose it. Usually, you need to add lots and lots of water to the caustic soda solution to dispose it. Make sure that you follow your local environmental regulations.
Done!


Hi guys. I am still finding cool articles on your website. Seems like everytime I look at something another interesting topic pops up. Anyway, this article about “fixing” bad paint jobs is right up my alley. A few years ago I shot a 66 GTO with I believe a bad can of lacquer. I have painted styrene kits straight from the cans before (with primer barriers of course) and had no issues. Anyway… Would your method for removing enamel work with lacquer paint as well??? I was going to use the old standby, Brake Fluid, but it can be a bugger to clean up after the paint has dissolved and sometimes doesn’t even work for enamels. Any suggestions? The GTO has had a lot of work put into the engine, chassis and interior detail and has been discontinued so it’s not like I am going to pick up a fresh kit body anytime soon.
I sure do like your website. Modelers dream 😀 Happy Holidays.
Hey David,
thanks for posting. I’m glad you liked the post!
The same as enamel, lacquer paint is actually not resistant to chemicals. So I guess this trick should work too. Let me know if it worked out. It would be a shame to let that GTO stay unfinished!
Greets,
Iggy
i have a less hazardous way to remove old enamel and lacquer paint it takes a little longer but works the same basic way and that will probably be cheaper in the long run i place the car in a old pencil bos and cover it with dot 3 or dot 4 brake fluid with dot 3 it takes about 2 days to soften up several layered or heavy paint but with dot 4 it takes about 1 day and i just close the lid and store the fluid for the next time i mess up or over shoot a car
the break fluid dont break down and isn’t so hard to dispose of
Thanks David! That’s a great alternative, since you can easy get brake fluid.
However, I think that flushing brake fluid down the sink isn’t a good idea either…
Iggy
I have a ton of old cars and trucks , and I have been sanding away details for years. this info is invaluable to me !I have been doing this for 30 plus years , and have even tried a can of thinner {and it melted my car !} . this will come in especialy handy for big trucks , with all the rivets . thanks guys .
Hi Ron, this is a very easy and effective method for removing paint from old kits without destroying the details. I’m glad you find our tips usefull
I wish I woulda seen this earlier it woulda been a big help on the 4 kits I have….. About a year ago I started air brushing and what better way to learn then by practicing on models.. So I found about 4 kits I had when I was younger that I go for Christmas ( ya know the ones you just painted the body and threw in the closet) and when I go them out I was kinda disappointed on the paint job so I ran to the hard ware store and got 3 packs of sand paper (600,1000,1500 grit) and started taking the paint off.. Now it looks ok but at one time the one was painted 2 different colors ( red and black. ) now what I guess I was wondering has anyone ever taken before pictures during pictures and after pictures like its a real restoration or am I one of those crazy guys that are into weird things?
I have never took pictures of a scale model restoration process… I’m sure someone must’ve done that